Simple Tree Drawing Step by Step || How to draw a Tree Easy - Simple Tree Drawing easy with this how-to video and step-by-step drawing instructions. How to draw a Tree for beginners and kids. Please see the drawing tutorial in the video below Video produced by channel: HTDraw You can refer to the simple step-by-step drawing guide below Step - https://htdraw.com/wp-content/uploads/2021/02/Tree-Drawing-easy-for-Beginners-1.jpg - https://htdraw.com/simple-tree-drawing-step-by-step-how-to-draw-a-tree-easy/
Simple Tree Drawing easy with this how-to video and step-by-step drawing instructions. How to draw a Tree for beginners and kids.
Video produced by channel: HTDraw
Start by drawing two parallel lines. The lines should be slightly curved towards each other. This will form the trunk of the tree.
Stretch one curve horizontally from each parallel line. Draw another curve below each line, connecting at a sharp point to the previous line. Concatenate the most recent lines with a short one. The lines will meet again at one point. You now have the roots of your tree.
Start drawing the branches by extending a curve from the left side of the trunk. On this line, draw three "U"-shaped lines - one on the left side of the trunk, one across the left line of the trunk, and a third at the top of the trunk.
Delete guides from branches.
Draw another branch on the right side of the tree, using two parallel curves and a "U" shaped line.
Create the composition on the leaves of the tree using a series of connected "U" curves. These eight paths should connect with the branches on the left side of the tree.
Surround the seashell shape using five additional "U" curves.
Start the leaf on the right side of the tree by drawing five "U"-shaped lines, connecting the right branches.
Erase a small part of the left branch.
Draw another border, connecting to the part you just deleted, using eight "U" shaped lines.
Use five "U"-shaped curves, which surround the stem on the right side of the tree.
Delete part between the right and middle border.
Draw three curves on the top of the tree, where the left and middle branches intersect.
Add details to the leaves of the plant. Draw three sets of three to five "U"-shaped lines inside the tree.
Add details to the trunk. Draw a "U" shaped line below the center of the branches. Draw a curve on each side of the trunk, extending to the roots. Draw a curve above the middle stem.
Draw a "U" shaped cluster of four lines to the right of the tree's top.
Add an extra branch of two parallel lines between the right branch and the tree branch.
Draw a circle in the trunk. Inside the circle, draw a swirl.
Plant your plants in the meadow. Draw grass on each side of the tree by drawing a series of eight short curves that meet at jagged points.
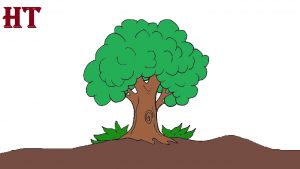
Color your tree. You may want to use brown for the stem and green for the leaves and grass.
- https://htdraw.com/wp-content/uploads/2021/02/Tree-Drawing-easy-for-Beginners-1.jpg - https://htdraw.com/simple-tree-drawing-step-by-step-how-to-draw-a-tree-easy/
Please see the drawing tutorial in the video below
Video produced by channel: HTDraw
You can refer to the simple step-by-step drawing guide below
Step 1
Start by drawing two parallel lines. The lines should be slightly curved towards each other. This will form the trunk of the tree.
Step 2
Stretch one curve horizontally from each parallel line. Draw another curve below each line, connecting at a sharp point to the previous line. Concatenate the most recent lines with a short one. The lines will meet again at one point. You now have the roots of your tree.
Step 3
Start drawing the branches by extending a curve from the left side of the trunk. On this line, draw three "U"-shaped lines - one on the left side of the trunk, one across the left line of the trunk, and a third at the top of the trunk.
Step 4
Delete guides from branches.
Step 5
Draw another branch on the right side of the tree, using two parallel curves and a "U" shaped line.
Step 6
Create the composition on the leaves of the tree using a series of connected "U" curves. These eight paths should connect with the branches on the left side of the tree.
Step 7
Surround the seashell shape using five additional "U" curves.
Step 8
Start the leaf on the right side of the tree by drawing five "U"-shaped lines, connecting the right branches.
Step 9
Erase a small part of the left branch.
Step 10
Draw another border, connecting to the part you just deleted, using eight "U" shaped lines.
Step 11
Use five "U"-shaped curves, which surround the stem on the right side of the tree.
Step 12
Delete part between the right and middle border.
Step 13
Draw three curves on the top of the tree, where the left and middle branches intersect.
Step 14
Add details to the leaves of the plant. Draw three sets of three to five "U"-shaped lines inside the tree.
Step 15
Add details to the trunk. Draw a "U" shaped line below the center of the branches. Draw a curve on each side of the trunk, extending to the roots. Draw a curve above the middle stem.
Step 16
Draw a "U" shaped cluster of four lines to the right of the tree's top.
Step 17
Add an extra branch of two parallel lines between the right branch and the tree branch.
Step 18
Draw a circle in the trunk. Inside the circle, draw a swirl.
Step 19
Plant your plants in the meadow. Draw grass on each side of the tree by drawing a series of eight short curves that meet at jagged points.
Step 20
Color your tree. You may want to use brown for the stem and green for the leaves and grass.
- https://htdraw.com/wp-content/uploads/2021/02/Tree-Drawing-easy-for-Beginners-1.jpg - https://htdraw.com/simple-tree-drawing-step-by-step-how-to-draw-a-tree-easy/


Nhận xét
Đăng nhận xét