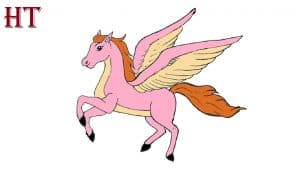
How to Draw a Pegasus Step by Step - How to Draw a Pegasus with wings easy with this how-to video and step-by-step drawing instructions. Easy drawing tutorial for beginners and kids. Please see the drawing tutorial in the video below Video produced by channel: HTDraw You can refer to the simple step-by-step drawing guide - https://htdraw.com/wp-content/uploads/2021/04/How-to-Draw-a-Pegasus.jpg - https://htdraw.com/how-to-draw-a-pegasus-step-by-step-3/
How to Draw a Pegasus with wings easy with this how-to video and step-by-step drawing instructions. Easy drawing tutorial for beginners and kids.

Video produced by channel: HTDraw
Start by drawing a circle. This will help you to draw the animal's head.
Use the curves to outline the ears and muzzle. Draw the ears triangular, draw details inside the near ear. Use a curve to surround the protruding mane between the ears. Use a pair of overlapping curves to form the snout and a small shaded oval to indicate the nostrils.
Erase the guide lines left by the original circle, leaving a clear outline of the horse's head.
Use long and curved lines to form the horse's neck, shoulders, and chest.
Use a series of curves that meet at jagged points to outline the flowing mane. Use the additional curves to add texture to the mane.
Stretch two long and curved lines from the mane to form the upper part of the wing. The lines should bend near a right angle. Then, use a series of "U" shaped lines to outline the lower part of the wing, indicating the presence of flying feathers. Draw curves parallel to the wing tip and complementary lines for the seashell edges of the "U"-shaped lines, giving the feather texture.
Use pairs of curves to outline the horse's legs. Pay attention to bends on elbows and wrists. Surround an irregular circle at the bottom of each leg to denote the claw.
Elongate one curve from the front leg to form the belly and another curve from the back to form the buttock. Then stretch the two pairs of curves to form the hind legs. Note the curves on the spindle and the rotation. Close the pointed nail at the end of each leg.
Stretch the curves and length from the buttocks, outlining the flowing tail. Use curves that meet at jagged points. Then use the additional curves to vignette the tail. Draw curves from behind the ears, down to the neck, and across the belly to represent the underside of the horse. Draw a circle in a circle and shade between them to form the eye. Detailed eyelids and eyebrows with curves.
Color your flying Pegasus. Legendary Pegasus is usually white in color.
- https://htdraw.com/wp-content/uploads/2021/04/How-to-Draw-a-Pegasus.jpg - https://htdraw.com/how-to-draw-a-pegasus-step-by-step-3/

Please see the drawing tutorial in the video below
Video produced by channel: HTDraw
You can refer to the simple step-by-step drawing guide below
Step 1
Start by drawing a circle. This will help you to draw the animal's head.
Step 2
Use the curves to outline the ears and muzzle. Draw the ears triangular, draw details inside the near ear. Use a curve to surround the protruding mane between the ears. Use a pair of overlapping curves to form the snout and a small shaded oval to indicate the nostrils.
Step 3
Erase the guide lines left by the original circle, leaving a clear outline of the horse's head.
Step 4
Use long and curved lines to form the horse's neck, shoulders, and chest.
Step 5
Use a series of curves that meet at jagged points to outline the flowing mane. Use the additional curves to add texture to the mane.
Step 6
Stretch two long and curved lines from the mane to form the upper part of the wing. The lines should bend near a right angle. Then, use a series of "U" shaped lines to outline the lower part of the wing, indicating the presence of flying feathers. Draw curves parallel to the wing tip and complementary lines for the seashell edges of the "U"-shaped lines, giving the feather texture.
Step 7
Use pairs of curves to outline the horse's legs. Pay attention to bends on elbows and wrists. Surround an irregular circle at the bottom of each leg to denote the claw.
Step 8
Elongate one curve from the front leg to form the belly and another curve from the back to form the buttock. Then stretch the two pairs of curves to form the hind legs. Note the curves on the spindle and the rotation. Close the pointed nail at the end of each leg.
Step 9
Stretch the curves and length from the buttocks, outlining the flowing tail. Use curves that meet at jagged points. Then use the additional curves to vignette the tail. Draw curves from behind the ears, down to the neck, and across the belly to represent the underside of the horse. Draw a circle in a circle and shade between them to form the eye. Detailed eyelids and eyebrows with curves.
Step 10
Color your flying Pegasus. Legendary Pegasus is usually white in color.
- https://htdraw.com/wp-content/uploads/2021/04/How-to-Draw-a-Pegasus.jpg - https://htdraw.com/how-to-draw-a-pegasus-step-by-step-3/
Nhận xét
Đăng nhận xét