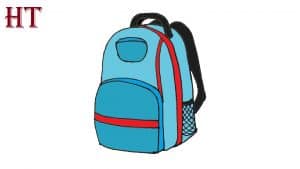
School Bag Drawing Step by Step for Beginners - School Bag Drawing easy with this how-to video and step-by-step drawing instructions. Easy drawing tutorial for beginners and kids. Please see the drawing tutorial in the video below Video produced by channel: HTDraw You can refer to the simple step-by-step drawing guide below Step - https://htdraw.com/wp-content/uploads/2021/04/how-to-draw-a-school-bag-1.jpg - https://htdraw.com/school-bag-drawing-step-by-step-for-beginners/
School Bag Drawing easy with this how-to video and step-by-step drawing instructions. Easy drawing tutorial for beginners and kids.

Video produced by channel: HTDraw
Start by drawing a curve. This will form the bottom of the backpack.
Draw a long, arched curve above the existing line, connecting it at each corner. This outlines the front of the backpack.
Draw another curve from the top of the backpack to its bottom. This gives the backpack a three-dimensional shape.
Add details and stitches to your backpack. Draw a parallel curve with the side of the backpack. Sketch the bag or pocket on the front using a curve. The resulting shape should overlap the contour of the backpack and sport right angles. Draw a parallel curve with the edge of this bag, giving it some depth. Then draw a few curves to connect the top of the bag to the top of the backpack.
Adorn the front of the bag with a pair of horizontal, curved lines. Wrap an irregular circle near the top of the backpack and draw a line across it. Use some curves to outline the handle on the backpack.
Delete instruction lines if necessary. Border the shoulder straps using the pairs of curves. Draw a buckle that adjusts the strap length by placing a pointed drop of water in another shape.
Draw a few short curves across the side of the backpack and place a "U" shape below it. Draw a diagonal pattern - diagonal lines at right angles - in the shape to form a mesh water bottle compartment.
Draw school supplies into the front pocket. Surround a rectangle to form a notebook, with small circles at the top indicating a spiral binding. Draw wavy lines across it to represent writing. Next to the notebook, place a rectangular and pointed ruler and pencil. Draw curves across the mouth of the bag to form the bulging portion of the supplemental school supplies.
Add details of zipper teeth along the seem by drawing small lines on them. Draw a water bottle in the side pocket using some curves.
Color your backpack. Backpacks can be found in every color imaginable, so feel free to get creative. Will your color be your favorite color or will it match your school's official color?
- https://htdraw.com/wp-content/uploads/2021/04/how-to-draw-a-school-bag-1.jpg - https://htdraw.com/school-bag-drawing-step-by-step-for-beginners/

Please see the drawing tutorial in the video below
Video produced by channel: HTDraw
You can refer to the simple step-by-step drawing guide below
Step 1
Start by drawing a curve. This will form the bottom of the backpack.
Step 2
Draw a long, arched curve above the existing line, connecting it at each corner. This outlines the front of the backpack.
Step 3
Draw another curve from the top of the backpack to its bottom. This gives the backpack a three-dimensional shape.
Step 4
Add details and stitches to your backpack. Draw a parallel curve with the side of the backpack. Sketch the bag or pocket on the front using a curve. The resulting shape should overlap the contour of the backpack and sport right angles. Draw a parallel curve with the edge of this bag, giving it some depth. Then draw a few curves to connect the top of the bag to the top of the backpack.
Step 5
Adorn the front of the bag with a pair of horizontal, curved lines. Wrap an irregular circle near the top of the backpack and draw a line across it. Use some curves to outline the handle on the backpack.
Step 6
Delete instruction lines if necessary. Border the shoulder straps using the pairs of curves. Draw a buckle that adjusts the strap length by placing a pointed drop of water in another shape.
Step 7
Draw a few short curves across the side of the backpack and place a "U" shape below it. Draw a diagonal pattern - diagonal lines at right angles - in the shape to form a mesh water bottle compartment.
Step 8
Draw school supplies into the front pocket. Surround a rectangle to form a notebook, with small circles at the top indicating a spiral binding. Draw wavy lines across it to represent writing. Next to the notebook, place a rectangular and pointed ruler and pencil. Draw curves across the mouth of the bag to form the bulging portion of the supplemental school supplies.
Step 9
Add details of zipper teeth along the seem by drawing small lines on them. Draw a water bottle in the side pocket using some curves.
Step 10
Color your backpack. Backpacks can be found in every color imaginable, so feel free to get creative. Will your color be your favorite color or will it match your school's official color?
- https://htdraw.com/wp-content/uploads/2021/04/how-to-draw-a-school-bag-1.jpg - https://htdraw.com/school-bag-drawing-step-by-step-for-beginners/
Nhận xét
Đăng nhận xét