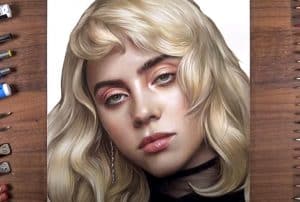
How to draw Billie Eilish Step by Step - How to draw Billie Eilish Step by Step with this how-to video and step-by-step drawing instructions. Pencil drawing tutorials for beginners and everyone. Please see the drawing tutorial in the video below Video produced by channel : drawholic You can refer to the simple step-by-step - https://htdraw.com/wp-content/uploads/2021/05/How-to-draw-Billie-Eilish-Step-by-Step.jpg - https://htdraw.com/how-to-draw-billie-eilish-step-by-step/
How to draw Billie Eilish Step by Step with this how-to video and step-by-step drawing instructions. Pencil drawing tutorials for beginners and everyone.

Video produced by channel : drawholic
Start by drawing guide lines that will help you effectively outline the face. Start with a circle. Cross it with a pair of slightly curved lines - one vertical, one horizontal. The lines cross each other at a right angle. Draw a few short marks on the horizontal line.
Use curved lines to start outlining the face. Using the intersection of the lines and the point where the vertical line intersects the circle as a guide, outline the ridge and tip using a curved line. Use another curved line to outline the nostrils. Then use the point where the horizontal line intersects the circle and the top of the vertical line to aid you in outlining the cheeks and chin.
Remove part of the original circle. Draw the eyes, using the small marks on the horizontal line as a guide. Use thick, curved lines to outline the two-pointed shape of each eye. Use a short line to mark the inner corner of each eye. Shade a small circle for the pupil and enclose a larger partial circle to represent the iris. Draw in a curved line along the upper and lower eyelids and at the corners of the eyes.
Delete the horizontal guide. Use long and short curved lines to draw lashes below each eye. Use curved lines to contour the eyebrows and hairline, outline the curved shapes of the eyebrows, outline the lips and outline above and below them.
Delete the vertical guide. Use a series of overlapping curves to complete the hairline and to indicate a section of hair. Then, use long, curved lines that meet at one point to wrap the first curl.
Delete another part of the original circle. Then use long, curved lines to outline the top of Billie's head and continue to outline the curls. Use another curved line to form the neck.
Delete the remaining guide lines. Use curved lines that meet at points to form the remaining curls.
Use curved lines that meet at points to draw more curls on the opposite side. Hair texture with curves.
Continue the hair texture with curves. Draw two sets of curves around the neck - one for the garment collar, the other for the spiked dog collar. Draw narrow triangles with curved bottoms around the collar.
Color your Billie Eilish cartoon. When this photo was taken, she dyed her hair black and wore an all-black outfit. - https://htdraw.com/wp-content/uploads/2021/05/How-to-draw-Billie-Eilish-Step-by-Step.jpg - https://htdraw.com/how-to-draw-billie-eilish-step-by-step/

Please see the drawing tutorial in the video below
Video produced by channel : drawholic
You can refer to the simple step-by-step drawing guide below
Step 1
Start by drawing guide lines that will help you effectively outline the face. Start with a circle. Cross it with a pair of slightly curved lines - one vertical, one horizontal. The lines cross each other at a right angle. Draw a few short marks on the horizontal line.
Step 2
Use curved lines to start outlining the face. Using the intersection of the lines and the point where the vertical line intersects the circle as a guide, outline the ridge and tip using a curved line. Use another curved line to outline the nostrils. Then use the point where the horizontal line intersects the circle and the top of the vertical line to aid you in outlining the cheeks and chin.
Step 3
Remove part of the original circle. Draw the eyes, using the small marks on the horizontal line as a guide. Use thick, curved lines to outline the two-pointed shape of each eye. Use a short line to mark the inner corner of each eye. Shade a small circle for the pupil and enclose a larger partial circle to represent the iris. Draw in a curved line along the upper and lower eyelids and at the corners of the eyes.
Step 4
Delete the horizontal guide. Use long and short curved lines to draw lashes below each eye. Use curved lines to contour the eyebrows and hairline, outline the curved shapes of the eyebrows, outline the lips and outline above and below them.
Step 5
Delete the vertical guide. Use a series of overlapping curves to complete the hairline and to indicate a section of hair. Then, use long, curved lines that meet at one point to wrap the first curl.
Step 6
Delete another part of the original circle. Then use long, curved lines to outline the top of Billie's head and continue to outline the curls. Use another curved line to form the neck.
Step 7
Delete the remaining guide lines. Use curved lines that meet at points to form the remaining curls.
Step 8
Use curved lines that meet at points to draw more curls on the opposite side. Hair texture with curves.
Step 9
Continue the hair texture with curves. Draw two sets of curves around the neck - one for the garment collar, the other for the spiked dog collar. Draw narrow triangles with curved bottoms around the collar.
Step 10
Color your Billie Eilish cartoon. When this photo was taken, she dyed her hair black and wore an all-black outfit. - https://htdraw.com/wp-content/uploads/2021/05/How-to-draw-Billie-Eilish-Step-by-Step.jpg - https://htdraw.com/how-to-draw-billie-eilish-step-by-step/
Nhận xét
Đăng nhận xét