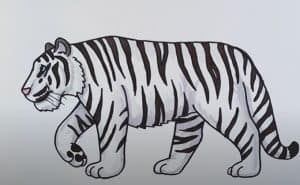
How to Draw a Siberian Tiger Step by Step - How to Draw a Siberian Tiger easy with this how-to video and step-by-step drawing instructions. How to draw animals for beginners and kids. Please see the drawing tutorial in the video below Video produced by channel : Art Land You can refer to the simple step-by-step drawing guide - https://htdraw.com/wp-content/uploads/2021/09/How-to-Draw-a-Siberian-Tiger-Step-by-Step.jpg - https://htdraw.com/how-to-draw-a-siberian-tiger-step-by-step/
How to Draw a Siberian Tiger easy with this how-to video and step-by-step drawing instructions. How to draw animals for beginners and kids.

Video produced by channel : Art Land
Let's start drawing our Tiger by making the head. It's just a few oblique lines, connected by curves! The top of the head is a downward slant, curved back into the nose and finally the upper lip. The other line makes the chin, slanted down and to the right, connecting with a small detour to the upper lip. This creates the chin and lower lip, and a smaller line is placed behind a curved line at the back of the chin to soften its mane.
The ears are drawn with two circular lines, not joined to form a circle. The outer one is elongated at one end, and is as long as an oval. The inner figure is a C shape. The eye is a simple small oval above the nose. Then add whiskers on tiger cheeks!
Now we draw the front leg. It is a set of simple lines that join into small curves, starting from the mane down to form the legs. It curves backwards to make the back of the leg. Add some stripes while you're here!
Draw two lines going down right after the curved leg you drew. Add a curved line at the bottom to imply the flat foot of the leg is not visible. Add some stripes here too!
Draw the belly and back with curved lines. The lower part should leave room for the hind legs, while the upper part should have a hump just above the front legs.
The hind legs are a simple sock shape, starting wide at the top and closer together at the bottom. Add some stripes here too.
Now draw the long and slender tail at the back of it. It should be two curved lines next to each other and connected to a rounded end. Don't forget to put stripes on too!
Draw the final leg by creating another sock shape like the other back leg, starting wide at the top and ending thinner at the bottom. It will start about a quarter of the way down the first hind leg and just below the tail. Put the stripes here too!
Now add lots of stripes along the tiger, and you're done! You have a Siberian tiger! - https://htdraw.com/wp-content/uploads/2021/09/How-to-Draw-a-Siberian-Tiger-Step-by-Step.jpg - https://htdraw.com/how-to-draw-a-siberian-tiger-step-by-step/

Please see the drawing tutorial in the video below
Video produced by channel : Art Land
You can refer to the simple step-by-step drawing guide below
Step 1
Let's start drawing our Tiger by making the head. It's just a few oblique lines, connected by curves! The top of the head is a downward slant, curved back into the nose and finally the upper lip. The other line makes the chin, slanted down and to the right, connecting with a small detour to the upper lip. This creates the chin and lower lip, and a smaller line is placed behind a curved line at the back of the chin to soften its mane.
Step 2
The ears are drawn with two circular lines, not joined to form a circle. The outer one is elongated at one end, and is as long as an oval. The inner figure is a C shape. The eye is a simple small oval above the nose. Then add whiskers on tiger cheeks!
Step 3
Now we draw the front leg. It is a set of simple lines that join into small curves, starting from the mane down to form the legs. It curves backwards to make the back of the leg. Add some stripes while you're here!
Step 4
Draw two lines going down right after the curved leg you drew. Add a curved line at the bottom to imply the flat foot of the leg is not visible. Add some stripes here too!
Step 5
Draw the belly and back with curved lines. The lower part should leave room for the hind legs, while the upper part should have a hump just above the front legs.
Step 6
The hind legs are a simple sock shape, starting wide at the top and closer together at the bottom. Add some stripes here too.
Step 7
Now draw the long and slender tail at the back of it. It should be two curved lines next to each other and connected to a rounded end. Don't forget to put stripes on too!
Step 8
Draw the final leg by creating another sock shape like the other back leg, starting wide at the top and ending thinner at the bottom. It will start about a quarter of the way down the first hind leg and just below the tail. Put the stripes here too!
Step 9
Now add lots of stripes along the tiger, and you're done! You have a Siberian tiger! - https://htdraw.com/wp-content/uploads/2021/09/How-to-Draw-a-Siberian-Tiger-Step-by-Step.jpg - https://htdraw.com/how-to-draw-a-siberian-tiger-step-by-step/
Nhận xét
Đăng nhận xét