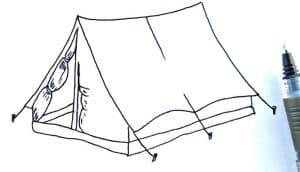
How to Draw a Tent Step by Step - How to Draw a Tent easy with this how-to video and step-by-step drawing instructions. Simple drawing for kids and everyone. Please see the drawing tutorial in the video below Video produced by channel : b6 Arts for kids You can refer to the simple step-by-step drawing guide below Step - https://htdraw.com/wp-content/uploads/2022/01/How-to-Draw-a-Tent.jpg - https://htdraw.com/how-to-draw-a-tent-step-by-step/
How to Draw a Tent easy with this how-to video and step-by-step drawing instructions. Simple drawing for kids and everyone.

Video produced by channel : b6 Arts for kids
Use four curved lines to draw a curved rectangle. This forms one side of the tent.
Erase the bottom part of the shape and replace it with two curved lines. Draw additional lines down the center of the rectangle. This is detailed how the tent is tied down.
Use curved lines to enclose a rectangle below the face of the tent. Draw another line across it, parallel to the bottom of the rectangle.
Use four curved lines to outline in front of the tent. It should be shaped like a house, like a triangle on top of a rectangle. Draw a curved line parallel to the bottom of the shape.
Use a series of overlapping curves to connect the top of the front of the tent to its bottom. This indicates that the cloth cover is open.
Draw a series of shapes along one side of the front of the tent. from the top, draw a pair of parallel lines, two "C" shaped lines and an extended oval, more "C" shaped lines, and another extended oval. Draw short lines at the joints of the shapes. This represents a canvas tent flap tied to the tent pole.
Draw a set of vertical, parallel lines inside the tent, indicating the tent pole. Draw another set of parallel diagonal lines inside the tent, indicating the bottom of that tent face.
Draw pairs of parallel curves extending from the points of the side panels of the tent. Draw a small cylinder with a circle at its base at the end of each cylinder. These are the tent ropes and tent pegs to hold the tent in place.
Draw curved lines from the front of the opposite side, with a cylinder at the end, forming the final tent pin.
Color your cartoon tent. There was a time when tents only had brown and olive tarpaulins, but today, they come in every color you can imagine! - https://htdraw.com/wp-content/uploads/2022/01/How-to-Draw-a-Tent.jpg - https://htdraw.com/how-to-draw-a-tent-step-by-step/

Please see the drawing tutorial in the video below
Video produced by channel : b6 Arts for kids
You can refer to the simple step-by-step drawing guide below
Step 1
Use four curved lines to draw a curved rectangle. This forms one side of the tent.
Step 2
Erase the bottom part of the shape and replace it with two curved lines. Draw additional lines down the center of the rectangle. This is detailed how the tent is tied down.
Step 3
Use curved lines to enclose a rectangle below the face of the tent. Draw another line across it, parallel to the bottom of the rectangle.
Step 4
Use four curved lines to outline in front of the tent. It should be shaped like a house, like a triangle on top of a rectangle. Draw a curved line parallel to the bottom of the shape.
Step 5
Use a series of overlapping curves to connect the top of the front of the tent to its bottom. This indicates that the cloth cover is open.
Step 6
Draw a series of shapes along one side of the front of the tent. from the top, draw a pair of parallel lines, two "C" shaped lines and an extended oval, more "C" shaped lines, and another extended oval. Draw short lines at the joints of the shapes. This represents a canvas tent flap tied to the tent pole.
Step 7
Draw a set of vertical, parallel lines inside the tent, indicating the tent pole. Draw another set of parallel diagonal lines inside the tent, indicating the bottom of that tent face.
Step 8
Draw pairs of parallel curves extending from the points of the side panels of the tent. Draw a small cylinder with a circle at its base at the end of each cylinder. These are the tent ropes and tent pegs to hold the tent in place.
Step 9
Draw curved lines from the front of the opposite side, with a cylinder at the end, forming the final tent pin.
Step 10
Color your cartoon tent. There was a time when tents only had brown and olive tarpaulins, but today, they come in every color you can imagine! - https://htdraw.com/wp-content/uploads/2022/01/How-to-Draw-a-Tent.jpg - https://htdraw.com/how-to-draw-a-tent-step-by-step/
Nhận xét
Đăng nhận xét