How To Draw A Shield Step by Step - How To Draw A Shield easy with this how-to video and step-by-step drawing instructions. Learn to draw for beginners for beginners and All. Please see the drawing tutorial in the video below Video produced by channel: Pencil Drawing Academy You can refer to the simple step-by-step drawing - https://htdraw.com/wp-content/uploads/2022/03/How-To-Draw-A-Shield.jpg - https://htdraw.com/how-to-draw-a-shield-step-by-step/
How To Draw A Shield easy with this how-to video and step-by-step drawing instructions. Learn to draw for beginners for beginners and All.

Video produced by channel: Pencil Drawing Academy
Start drawing the upper part of the shield with a series of curved lines. Included in this is a "V" shaped circle. Draw a curved line through the top of the "V" to give the notch a three-dimensional shape.
Use a long, curved line to complete the top of the shield. On each side of the groove, draw a curved line parallel to the contour, contributing to a three-dimensional shape.
Draw the side of the shield using two long curved lines with a "V" shaped line between them. Draw a curved line through the "V" shaped line to give the notch a three-dimensional shape.
Complete the outline of the shield using a long, curved line. Then draw curved lines parallel to the top and bottom of the shield. Draw short lines between these and the corners of the shield, contributing to a three-dimensional shape.
Draw three connected curves, roughly parallel to the top and top faces of the shield. Then draw small ovals between the lines and the edge of the shield. They represent the studs that hold the shield together.
From the previous lines, draw a pair of curves that meet at a point at the bottom. Then draw more stud ovals around the edge of the shield.
Use curved lines to draw a boomerang across the front of the shield, showing previous damage. Then draw curved vertical lines through the shield, indicating the wooden planks from which it is made.
Draw a circle in the center of the shield, erasing as needed. Then draw more horizontal lines.
Use curved lines to enclose a wing shape in the center of the shield. Then draw an oval near the edge of the circle.
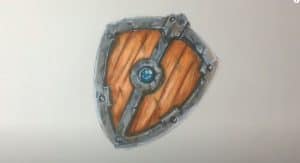
Color your cartoon shield. In our example, we have colored the wood brown and the metal parts gray. But you can make your shield in any color you can choose - in the past, shields were usually painted with the crest or emblem of a village or tribe. - https://htdraw.com/wp-content/uploads/2022/03/How-To-Draw-A-Shield.jpg - https://htdraw.com/how-to-draw-a-shield-step-by-step/

Please see the drawing tutorial in the video below
Video produced by channel: Pencil Drawing Academy
You can refer to the simple step-by-step drawing guide below
Step 1
Start drawing the upper part of the shield with a series of curved lines. Included in this is a "V" shaped circle. Draw a curved line through the top of the "V" to give the notch a three-dimensional shape.
Step 2
Use a long, curved line to complete the top of the shield. On each side of the groove, draw a curved line parallel to the contour, contributing to a three-dimensional shape.
Step 3
Draw the side of the shield using two long curved lines with a "V" shaped line between them. Draw a curved line through the "V" shaped line to give the notch a three-dimensional shape.
Step 4
Complete the outline of the shield using a long, curved line. Then draw curved lines parallel to the top and bottom of the shield. Draw short lines between these and the corners of the shield, contributing to a three-dimensional shape.
Step 5
Draw three connected curves, roughly parallel to the top and top faces of the shield. Then draw small ovals between the lines and the edge of the shield. They represent the studs that hold the shield together.
Step 6
From the previous lines, draw a pair of curves that meet at a point at the bottom. Then draw more stud ovals around the edge of the shield.
Step 7
Use curved lines to draw a boomerang across the front of the shield, showing previous damage. Then draw curved vertical lines through the shield, indicating the wooden planks from which it is made.
Step 8
Draw a circle in the center of the shield, erasing as needed. Then draw more horizontal lines.
Step 9
Use curved lines to enclose a wing shape in the center of the shield. Then draw an oval near the edge of the circle.
Step 10
Color your cartoon shield. In our example, we have colored the wood brown and the metal parts gray. But you can make your shield in any color you can choose - in the past, shields were usually painted with the crest or emblem of a village or tribe. - https://htdraw.com/wp-content/uploads/2022/03/How-To-Draw-A-Shield.jpg - https://htdraw.com/how-to-draw-a-shield-step-by-step/
Nhận xét
Đăng nhận xét