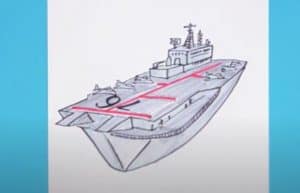
How to Draw an Aircraft Carrier Step by Step - How to Draw an Aircraft Carrier Easy with this how-to video and step-by-step drawing instructions. Easy drawings for beginners and everyone. Please see the drawing tutorial in the video below Video produced by channel: Art For All You can refer to the simple step-by-step drawing guide - https://htdraw.com/wp-content/uploads/2022/07/How-to-Draw-an-Aircraft-Carrier.jpg - https://htdraw.com/how-to-draw-an-aircraft-carrier-step-by-step/
How to Draw an Aircraft Carrier Easy with this how-to video and step-by-step drawing instructions. Easy drawings for beginners and everyone.

Video produced by channel: Art For All
You will begin this step by drawing out the shape of the warship's hull and deck. Next you'll draw the shape of the "island" where everything like the navigation bridge, the flag bridge is located, it's also where all the radars and electronics as well as the flight deck control room are located.
You will now start sketching all the beams, railings, electronics, etc. for the island of this aircraft carrier or battleship. Aircraft carriers are also known as battleships because they contain a wide range of firepower on board. It is fully equipped with .50 caliber machine guns, rocket launchers and salute guns. Just take your time outlining the details of the island. In fact, I encourage you to enlarge this step as well as all the steps for this drawing tutorial.
You will finish sketching the island as you see here and take your time as I outlined in the previous step. When you're done, you can bring your island back one at a time to make sure you've drawn everything correctly. At the back or the rear of the ship, notice the protruding nodule, you need to draw that shape as well.
You can now start sketching the main part of the carrier starting with the main deck, and the railing off to the left hand side. Draw lines on the pavement of the flight deck and then also draw some "parking" lines. These dividers are where each aircraft is parked or seated until they are deployed.
You should now finish sketching the hull of the warship as you see here and then remember to draw more detailed lines. When you're done, you can start to carefully erase all the guides and shapes that you drew in step one. This will clean up your artboard so you can color it when you choose to do so.
When you're done, you'll have a drawing the same or similar to the one you see here. Color it and you're done. I hope you had fun with this lesson on "how to draw an aircraft carrier step by step". Be sure to join me again for more drawing fun. - https://htdraw.com/wp-content/uploads/2022/07/How-to-Draw-an-Aircraft-Carrier.jpg - https://htdraw.com/how-to-draw-an-aircraft-carrier-step-by-step/

Please see the drawing tutorial in the video below
Video produced by channel: Art For All
You can refer to the simple step-by-step drawing guide below
Step 1
You will begin this step by drawing out the shape of the warship's hull and deck. Next you'll draw the shape of the "island" where everything like the navigation bridge, the flag bridge is located, it's also where all the radars and electronics as well as the flight deck control room are located.
Step 2
You will now start sketching all the beams, railings, electronics, etc. for the island of this aircraft carrier or battleship. Aircraft carriers are also known as battleships because they contain a wide range of firepower on board. It is fully equipped with .50 caliber machine guns, rocket launchers and salute guns. Just take your time outlining the details of the island. In fact, I encourage you to enlarge this step as well as all the steps for this drawing tutorial.
Step 3
You will finish sketching the island as you see here and take your time as I outlined in the previous step. When you're done, you can bring your island back one at a time to make sure you've drawn everything correctly. At the back or the rear of the ship, notice the protruding nodule, you need to draw that shape as well.
Step 4
You can now start sketching the main part of the carrier starting with the main deck, and the railing off to the left hand side. Draw lines on the pavement of the flight deck and then also draw some "parking" lines. These dividers are where each aircraft is parked or seated until they are deployed.
Step 5
You should now finish sketching the hull of the warship as you see here and then remember to draw more detailed lines. When you're done, you can start to carefully erase all the guides and shapes that you drew in step one. This will clean up your artboard so you can color it when you choose to do so.
Step 6
When you're done, you'll have a drawing the same or similar to the one you see here. Color it and you're done. I hope you had fun with this lesson on "how to draw an aircraft carrier step by step". Be sure to join me again for more drawing fun. - https://htdraw.com/wp-content/uploads/2022/07/How-to-Draw-an-Aircraft-Carrier.jpg - https://htdraw.com/how-to-draw-an-aircraft-carrier-step-by-step/
Nhận xét
Đăng nhận xét