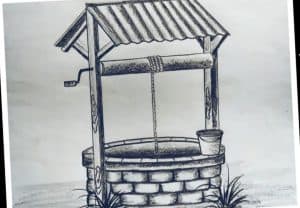
How to Draw a Well Step by Step - How to Draw a Well easy with this how-to video and step-by-step drawing instructions. Easy drawing tutorial for beginners and all. Please see the drawing tutorial in the video below Video produced by channel: AKR Art You can refer to the simple step-by-step drawing guide below Step - https://htdraw.com/wp-content/uploads/2022/09/How-to-Draw-a-Well.jpg - https://htdraw.com/how-to-draw-a-well-step-by-step/
How to Draw a Well easy with this how-to video and step-by-step drawing instructions. Easy drawing tutorial for beginners and all.

Video produced by channel: AKR Art
Step 1
Create a semi-cylindrical tube for the first step of the well. This will also be your possible base.
Step 2
The next thing you need to do is draw a large trapezoid for the roof of such a well, then move on to the third step.
Step 3
You will now connect the two shapes by drawing supports or arms that are attached to both the roof and the well shape. Draw the pivot and handle where the rope will be tied, then add some wood grain details.
Step 4
Next, you draw a donut shape on the top of the well and decorate it with a bunch of overgrown flowers like I did here. Or you can choose to create your own decorative well design. Once you've sketched out the flowers, leaves, and grass, you can draw the wire attached to the spindle.
Step 5
Use a loose stroke to draw the actual design or base of the tile. Once done, you can draw some bushes around the well and then move on to step six.
Step 6
Finally for the final drawing step, all you have to do is draw the rocks or bricks, then paint the shingles on the roof. The shingles can be wood or asphalt, that's completely up to you. Clean up the drawing and you're done.
Step 7
This is pretty good when you're done. Now you can get even more creative by adding your own colors. I hope you enjoyed this lesson on drawing a well. - https://htdraw.com/wp-content/uploads/2022/09/How-to-Draw-a-Well.jpg - https://htdraw.com/how-to-draw-a-well-step-by-step/

Please see the drawing tutorial in the video below
Video produced by channel: AKR Art
You can refer to the simple step-by-step drawing guide below
Step 1
Create a semi-cylindrical tube for the first step of the well. This will also be your possible base.
Step 2
The next thing you need to do is draw a large trapezoid for the roof of such a well, then move on to the third step.
Step 3
You will now connect the two shapes by drawing supports or arms that are attached to both the roof and the well shape. Draw the pivot and handle where the rope will be tied, then add some wood grain details.
Step 4
Next, you draw a donut shape on the top of the well and decorate it with a bunch of overgrown flowers like I did here. Or you can choose to create your own decorative well design. Once you've sketched out the flowers, leaves, and grass, you can draw the wire attached to the spindle.
Step 5
Use a loose stroke to draw the actual design or base of the tile. Once done, you can draw some bushes around the well and then move on to step six.
Step 6
Finally for the final drawing step, all you have to do is draw the rocks or bricks, then paint the shingles on the roof. The shingles can be wood or asphalt, that's completely up to you. Clean up the drawing and you're done.
Step 7
This is pretty good when you're done. Now you can get even more creative by adding your own colors. I hope you enjoyed this lesson on drawing a well. - https://htdraw.com/wp-content/uploads/2022/09/How-to-Draw-a-Well.jpg - https://htdraw.com/how-to-draw-a-well-step-by-step/
Nhận xét
Đăng nhận xét