How To Draw Anime Feet (Cartoon feet) Step by Step - How To Draw Anime Feet (Cartoon feet) with this how to video and step by step drawing instructions. Easy drawing tutorial for beginners and everyone. Please see Anime Feet drawing tutorial in the video below You can refer to Anime Feet simple step-by-step drawing guide below Step 1 When - https://htdraw.com/wp-content/uploads/2023/10/How-To-Draw-Anime-Feet.jpg - https://htdraw.com/how-to-draw-anime-feet-cartoon-feet-step-by-step/
How To Draw Anime Feet (Cartoon feet) with this how to video and step by step drawing instructions. Easy drawing tutorial for beginners and everyone.
When starting with the shape of the foot, it's best to sketch out the basic frame that the foot will form. I advise you to look at different positions of the feet and their different forms. As you refer, make a quick sketch of the frame/shape of the desired foot position, using sharp edges as you go along, will definitely speed up the process. This is called a warm start.
From the shapes shown above, I created these finished feet. See how the shape of the initial guide line evolves into these finely shaped feet? It is necessary to observe carefully and know how the foot is formed from bones, muscles and skin. Knowing that the foot is not like the hand, the leg connecting the foot will not be as flexible as the arm.
I want to discuss the different types of toes you can use to draw your feet. Some people have feet with toes that are longer than the big toe. Most normal human feet have a normal index finger compared to the big toe. Know that men's feet are usually boxier and longer than women's feet. Women often have softer, rounder toes to match the softer features of the rest of their body. Let's look at the wrong example of drawing the toes of the foot and see how invisible they look. Reference, practice and patience are all you need!
When a foot is placed on the ground, the toes will extend to grip the ground. When you lift a foot, the toes and foot will be at rest and slightly limp. This is because, as the foot balances on the ground, the body's weight is supported between the feet, putting pressure on those toes, pressing the flesh into the ground. Just like when you lie down, the skin on your body will be pushed inward. Look at the examples of drawing incorrect feet and observe how different they look from the examples above. Notice how the foot lands with flesh connecting from the toes to the foot. The foot will NOT curve inward as in the example below.
This basically shows you what I discussed in the previous step, about how the toes will flare out if they land. This also shows how a foot looks from the front. You don't see the sole or too much of the ankle. Remember, the opposite foot will always have the big toes on the same side of the foot, just like the big toes on the hand.
This is what the foot looks like from the bottom, exposing the sole and toes. See how they rest and are not separated from each other? You can say this is the resting position of the feet. Notice how the sole curves inward, as the forefoot has distinct zones that are lightly defined to represent impact marks caused by bone wear. I recommend using light defining lines for the 'cushion' of the toe.
Like I said before, to form the correct shape of the foot, you must draw the same base. This will make it easier for your visual memory to create the clear details and shapes that make up the full shape of the foot. Start by sketching the basic shape of the pose you want to create. This should be easy and drawn quickly. Try not to spend too much time drawing the instructions perfectly, otherwise you'll focus on the instructions rather than your goal.
Then, slowly, follow the actual shape of the foot, keeping distance from the nail guide lines. Take your time and try not to stay in the same place for too long!
Next, work on the smaller details, take your time. This will be much easier than the previous steps. If you need help in certain areas, go back to the tip steps presented at the beginning of this guide.
Finally, complete your legs by sketching out the necessary details. Use very thin line values for smaller details, just because it won't distract from the overall idea or focus. To create emphasis with line thickness, keep the most important lines (outlines) thicker than the inner detail lines.
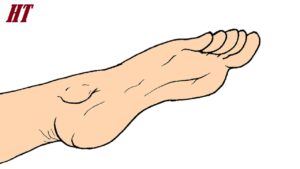
If you have followed the steps, you will get results like this. I hope you enjoyed this lesson, I had so much fun creating it. Feet are my favorite thing to draw on any level (they love miniature fat hands!). Thanks for watching and be sure to let me know if this was helpful. I always read your comments and find this tutorial a success, motivating me to create similar tutorials in the future!
- https://htdraw.com/wp-content/uploads/2023/10/How-To-Draw-Anime-Feet.jpg - https://htdraw.com/how-to-draw-anime-feet-cartoon-feet-step-by-step/
Please see Anime Feet drawing tutorial in the video below
You can refer to Anime Feet simple step-by-step drawing guide below
Step 1
When starting with the shape of the foot, it's best to sketch out the basic frame that the foot will form. I advise you to look at different positions of the feet and their different forms. As you refer, make a quick sketch of the frame/shape of the desired foot position, using sharp edges as you go along, will definitely speed up the process. This is called a warm start.
Step 2
From the shapes shown above, I created these finished feet. See how the shape of the initial guide line evolves into these finely shaped feet? It is necessary to observe carefully and know how the foot is formed from bones, muscles and skin. Knowing that the foot is not like the hand, the leg connecting the foot will not be as flexible as the arm.
Step 3
I want to discuss the different types of toes you can use to draw your feet. Some people have feet with toes that are longer than the big toe. Most normal human feet have a normal index finger compared to the big toe. Know that men's feet are usually boxier and longer than women's feet. Women often have softer, rounder toes to match the softer features of the rest of their body. Let's look at the wrong example of drawing the toes of the foot and see how invisible they look. Reference, practice and patience are all you need!
Step 4
When a foot is placed on the ground, the toes will extend to grip the ground. When you lift a foot, the toes and foot will be at rest and slightly limp. This is because, as the foot balances on the ground, the body's weight is supported between the feet, putting pressure on those toes, pressing the flesh into the ground. Just like when you lie down, the skin on your body will be pushed inward. Look at the examples of drawing incorrect feet and observe how different they look from the examples above. Notice how the foot lands with flesh connecting from the toes to the foot. The foot will NOT curve inward as in the example below.
Step 5
This basically shows you what I discussed in the previous step, about how the toes will flare out if they land. This also shows how a foot looks from the front. You don't see the sole or too much of the ankle. Remember, the opposite foot will always have the big toes on the same side of the foot, just like the big toes on the hand.
Step 6
This is what the foot looks like from the bottom, exposing the sole and toes. See how they rest and are not separated from each other? You can say this is the resting position of the feet. Notice how the sole curves inward, as the forefoot has distinct zones that are lightly defined to represent impact marks caused by bone wear. I recommend using light defining lines for the 'cushion' of the toe.
Step 7
Like I said before, to form the correct shape of the foot, you must draw the same base. This will make it easier for your visual memory to create the clear details and shapes that make up the full shape of the foot. Start by sketching the basic shape of the pose you want to create. This should be easy and drawn quickly. Try not to spend too much time drawing the instructions perfectly, otherwise you'll focus on the instructions rather than your goal.
Step 8
Then, slowly, follow the actual shape of the foot, keeping distance from the nail guide lines. Take your time and try not to stay in the same place for too long!
Step 9
Next, work on the smaller details, take your time. This will be much easier than the previous steps. If you need help in certain areas, go back to the tip steps presented at the beginning of this guide.
Step 10
Finally, complete your legs by sketching out the necessary details. Use very thin line values for smaller details, just because it won't distract from the overall idea or focus. To create emphasis with line thickness, keep the most important lines (outlines) thicker than the inner detail lines.
Step 11
If you have followed the steps, you will get results like this. I hope you enjoyed this lesson, I had so much fun creating it. Feet are my favorite thing to draw on any level (they love miniature fat hands!). Thanks for watching and be sure to let me know if this was helpful. I always read your comments and find this tutorial a success, motivating me to create similar tutorials in the future!
You can see more anime drawing:
- https://htdraw.com/wp-content/uploads/2023/10/How-To-Draw-Anime-Feet.jpg - https://htdraw.com/how-to-draw-anime-feet-cartoon-feet-step-by-step/


Nhận xét
Đăng nhận xét